How to setup a task to synchronise with WebDAV collection?
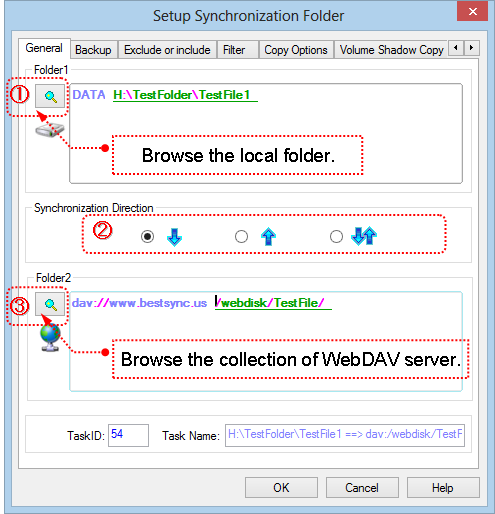
1. Click![]() to select the local folder into the "Folder1" edit box.
to select the local folder into the "Folder1" edit box.
2. Select the synchronisation direction.
 : One-way synchronise from Folder1 to Folder2.
 : One-way synchronise from Folder2 to Folder1.
 Two-way synchronisation.
3. Click![]() to show the "Browse Folder" dialogbox to select the collection of WebDAV Server into the "Folder2" edit box.
to show the "Browse Folder" dialogbox to select the collection of WebDAV Server into the "Folder2" edit box.
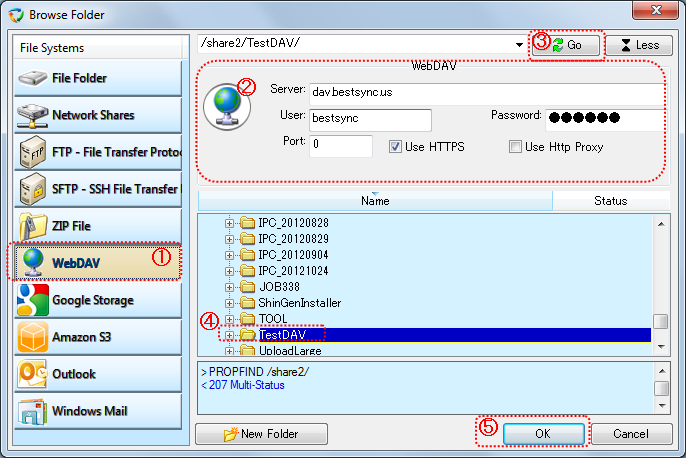
(1). Select "WebDAV" in the "File System" list.
(2). Setup the parameters for connecting to the WebDAV Server server.
Server is the hostname or IP address of the WebDav server.
User and Password is the login account of the server.
Port number can be left empty, BestSync will select the port number by the URL. 80 for HTTP, and 443 for HTTPS.
Check "Use HTTPS" if SSL/TLS secured communication is required by the server.
If http proxy is necessary in your network environment, please check "Use http proxy",HTTP proxy option dialog boxis shown, you can setup the HTTP proxy settings in the dialog box.
If you need to set some customized meta data to the file after upload it to WebDAV Server, press "Advanced" button to set the meta values.
(3). After setup the connection parameters, press "Go" button to connect to the WebDAV Server, the browser begins to list the folders into the tree view.
The log window below the treeview logs all the commands sent to the server, and responses from the server. If the connection between BestSync and server can not be established successfully, please check the log.
(4). Select the folder in the tree view.
(5). Click "OK" button to end the dialog box
4. Press "Next" to set other options, or press "Finish" to end the task wizard.