How to setup a task to synchronise with WebDAV collection.
This tutorial demonstrates how to setup a task to synchronise with a folder in WebDAV collection.
1. On the main windows, press the "Add task" button ( ) to add a task.
After you add a task, you can modify it later by press the "Setup task" button (![]() ).
).

The task wizard starts up.
2. On the "General" wizard page, set the local folder, synchronisation direction and the WebDAV folder like the following bitmap.
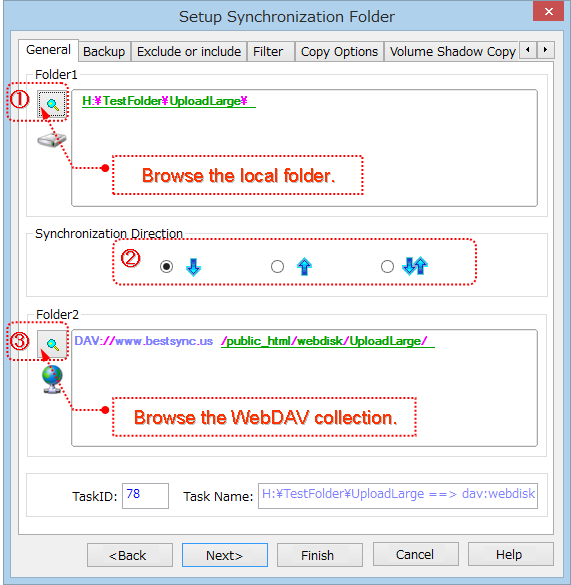
(1). Click
to select the local folder into the "Folder1" edit box.
(2). Select the synchronisation direction.
: One-way synchronise from Folder1 to Folder2.
: One-way synchronise from Folder2 to Folder1.
Two-way synchronisation.
(3). Click
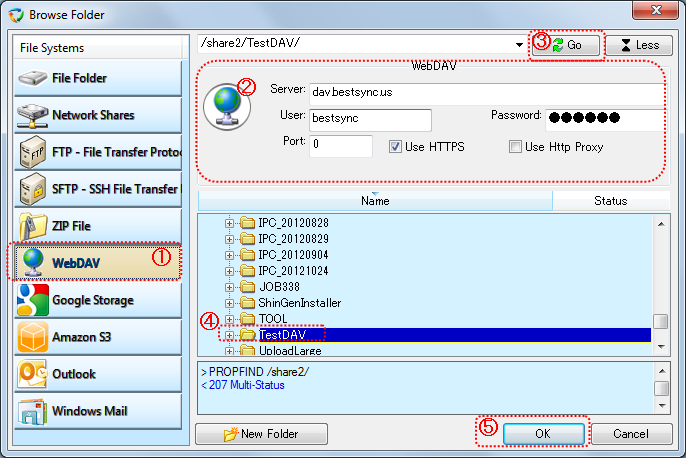
3. Browse the WebDAV folder.
(1). Select "WebDAV" in the "File System" list.
(2). Setup the parameters for connecting to the WebDAV Server server.
Server is the hostname or IP address of the WebDav server.
User and Password is the login account of the server.
Port number can be left empty, BestSync will select the port number by the URL. 80 for HTTP, and 443 for HTTPS.
Check "Use HTTPS" if SSL/TLS secured communication is required by the server.
If http proxy is necessary in your network environment, please check "Use http proxy",HTTP proxy option dialog boxis shown, you can setup the HTTP proxy settings in the dialog box.
If you need to set some customized meta data to the file after upload it to WebDAV Server, press "Advanced" button to set the meta values.
(3). After setup the connection parameters, press "Go" button to connect to the WebDAV Server, the browser begins to list the folders into the tree view.
The log window (below the treeview) logs all the commands sent to the server, and responses from the server. If the connection between BestSync and server can not be established successfully, please check the log.
(4). Select the folder in the tree view.
(5). Click "OK" button to end the dialog box
Press "Next" to set other options, or press "Finish" to end the task wizard.
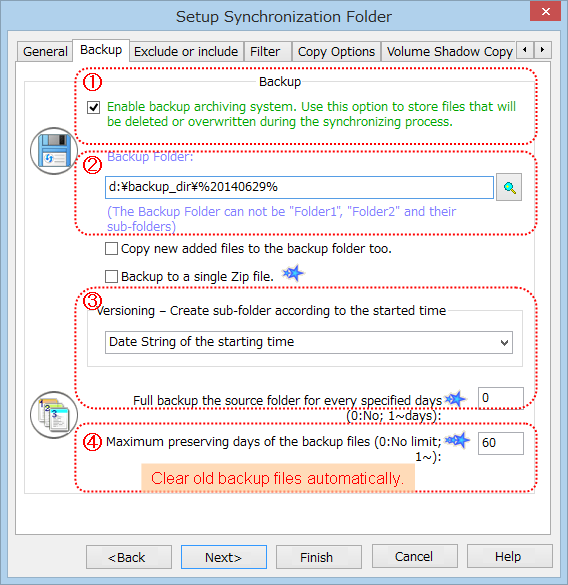
4. Setup the backup option.
If you need to backup all the changed/deleted files between two synchronisation times, you can set this backup options.
(1). Check "Enable backup archiving system...".
(2). Select a local folder to backup the files. If the following "Versioning" option is selected, sub-folders will be created under this folder.
(3). Select the "versioning" option. You can let the backup system to create a sub-folder every day, or even on sub-folder for every synchronisation.
If you input a full backup day number (non zero), BestSync backs up all the files in the synchronisation folder to a sub-folder for every specified days.(4). If you need to clear the old backup files, input a day number other than 0 into "Maximum preserving days of the backup files".
(5). Press "Next" to set other options, or press "Finish" to end the task wizard.
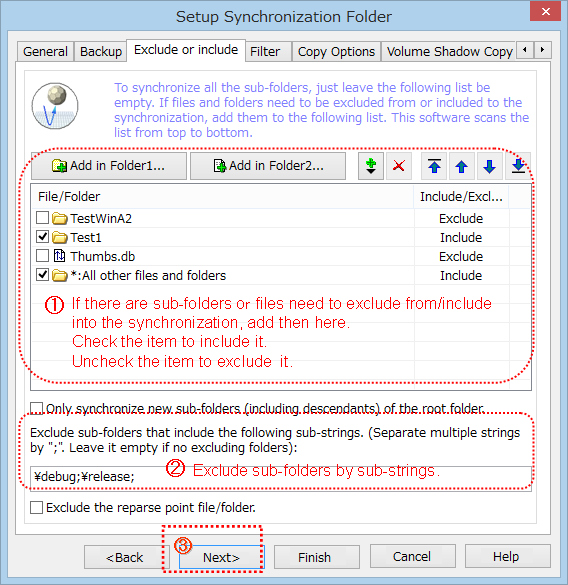
5. Exclude/include some folders or files from/into the synchronisation.
If no folders or files are needed to be excluded from the synchronisation, just click "Next" button.
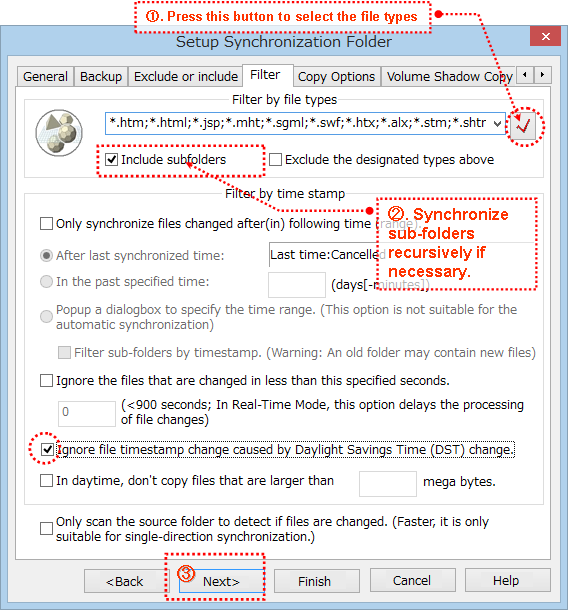
6. Select file types that are needed to be synchronised.
(1). Select the predefined file types from the combo-box, or click the selecting button to search all the file types, then select some file types.
(2). Check "Include subfolders" to synchronise the all the sub-folders recursively.
If your country uses Daylight Savings Time, and one of the two folders is FAT or FAT32 file system, please select the "Ignore file date&time changes that ate because of Daylight Savings Time (DST) changes" option, otherwise, when the DST changes, all the files may copied again.
(3). Press "Next" to set other options, or press "Finish" to end the task wizard.
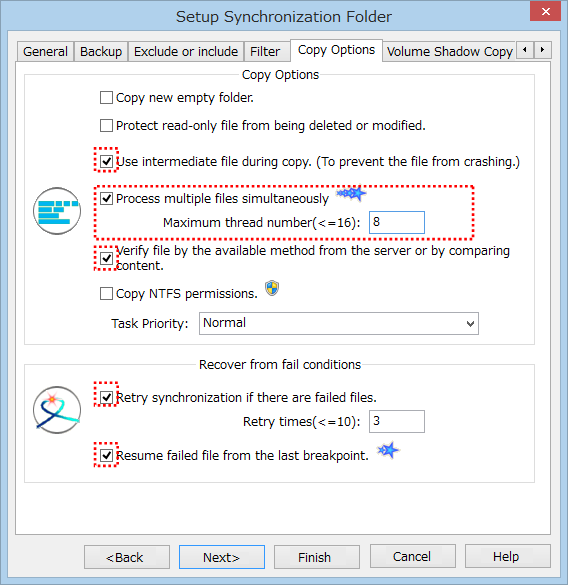
7. Select copy options.
The following graph is the recommended copy options.
"Use intermediate file during copy. (To prevent the file from being crashed.)"
If this option is checked, BestSync will use an intermediate file as the target file during copying process. When the file is copied successfully, the intermediate file is renamed to the target file. This action avoids an incomplete file in the target folder, and the target file is never cashed even if it fails to copy the file due to any error (such as network error)."Process multiple files simultaneously.":
If this option is checked, BestSync create multiple threads to copy multiple files concurrently. Set the thread number to the allowed number of the server. This option will improve the performance dramatically when synchronise with WebDAV folder, or other remote folders."Verify files by the available method from the server or by comparing content.":
If this option is checked, BestSync verify the uploaded/downloaded files to ensure the files are transferred correctly."Retry synchronisation if there are failed files.":
If this option is checked, BestSync will retry the synchronisation if there are failed items."Resume failed file from the breakpoint.":
If this option is checked, BestSync will resume the file copy operation from the last breakpoint. This option is very useful to copy a large file to/from WebDAV collection or other remote folders. If a file copy action is broken during network error, the file copy action is continued from the last break point.Press "Next" to set other options, or press "Finish" to end the task wizard.
8. Use "Volume Shadow Copy Service" when necessary.
If the task needs to copy the opened/locked files, check "Use Volume Shadow Copy Service to copy opened files……" option.
If this option is checked, the opened files such as windows registry file, data base file, Outlook .PST files can be copied. Some files such as the database file, and Outlook PST file are always locked, if you do not use this option, copying these files will fail, but this option will affect the system performance and take longer to complete the sync task.
If the OS is 64 Bit Windows, please install the x64 bit version of BestSync for using this option.
On Windows 7/8, please run BestSync by the administrator privilege when this option is checked.
Press "Next" to set other options, or press "Finish" to end the task wizard.

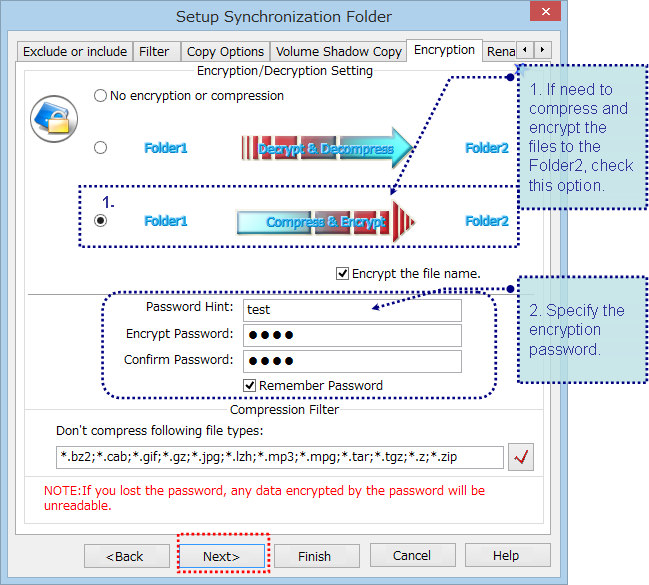
9. Use encryption option when necessary.
If you want to compress and encrypt the files while synchronise the files, select the options like following graph.
Press "Next" to set other options, or press "Finish" to end the task wizard.
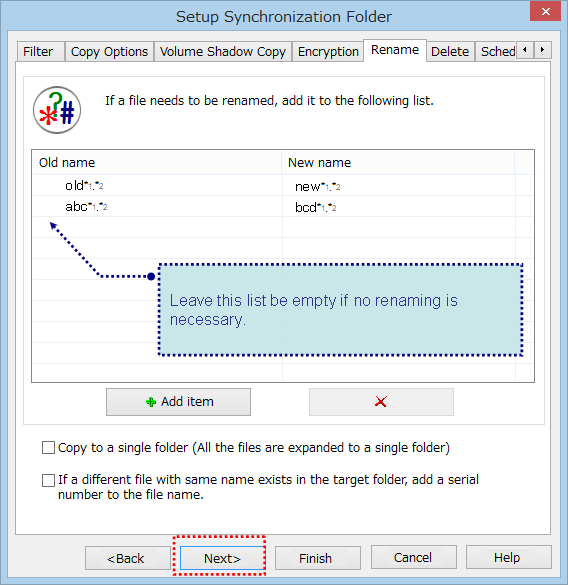
9. Use "Rename" option when necessary.
If need to rename files when synchronise the folders, add the renaming rules to the list in following graph.
Press "Next" to set other options, or press "Finish" to end the task wizard.
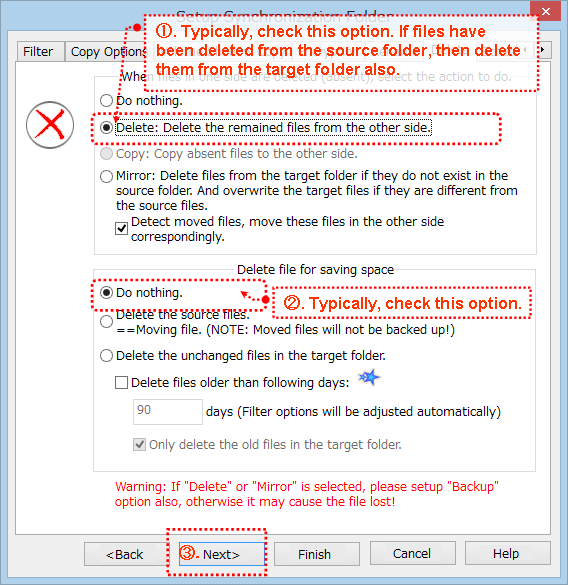
10. Select "Delete" options.
(1).Select the typical option "Delete: Delete the remained file in the other side".
"Do nothing". If you want to use a backup profile, that deleted files from the source will be kept in your Target Folder.
Or, "Delete: Delete remained file in the other side". If the files are deleted from the source, it will also be deleted from target folder.
Or, "Mirror: Delete file in ….". To make the contents of both folders identical. All the files that do not exist in the source folder will be deleted from the target folder. If the files in the source folder are old, the old files will overwrite the new files in the target folder.
(2). In "Delete file for save space", select the typical option "Do nothing".
(3).Press "Next" to set other options, or press "Finish" to end the task wizard.
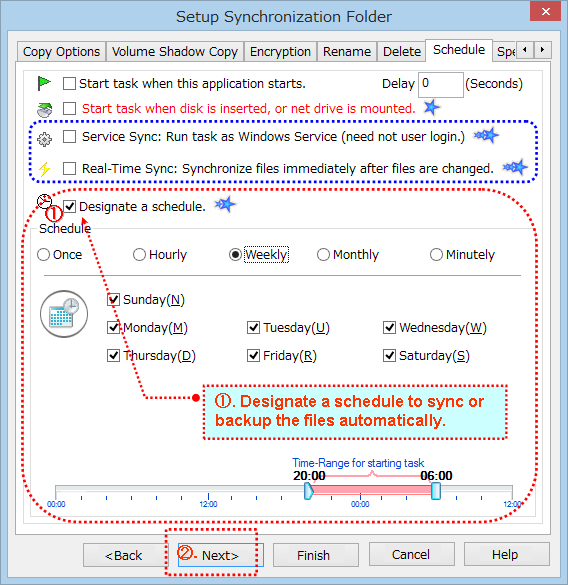
11. Select "Schedule" options.
(1).Select "Designate a schedule", and select a timing mode to start the task."
"Service Sync: Run task as Windows Service(need not user login)" is optional.
This option runs the task by BestSync Service. Even no user is logging on, or the user logs off, this task is still ran by the designated schedule.
If you want the changed files be backed up or synchronised immediately after they are changed, select the "Real-Time Sync...." option. Note, this option is not available if the source folder is a WebDAV folder.(2).Press "Next" to set other options, or press "Finish" to end the task wizard.
12. Presse the "Next" button to use the default log settings.
(1).Check "Record the log data for the log view window" option. This option will record the log data of the synchronisation. You can view the log data by the Log View, and if you have setup the "Backup" option in "Step 4", you can also restore the backup data conveniently in the Log View."
If you want to send the log data by the email to monitor the synchronisation remotely, check the "Send log data by e-mail" option. After this option is checked, the "General Option"/"Email" dialog box will popup, you can setup the email account in the dialog box.
(2).Press "Next" to set other options, or press "Finish" to end the task wizard.

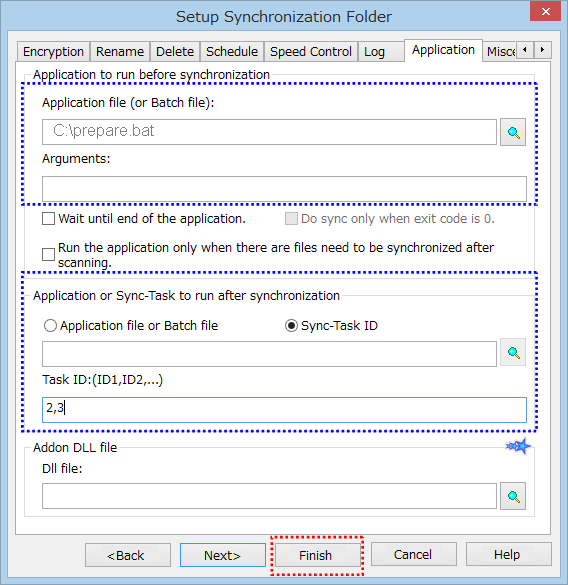
14. The "Application" options are optional.
You can set an application or batch file to run before or after the synchronisation here.
You can also set to start other tasks after this task by input the task IDs.
Press "Finish" to end the task wizard.
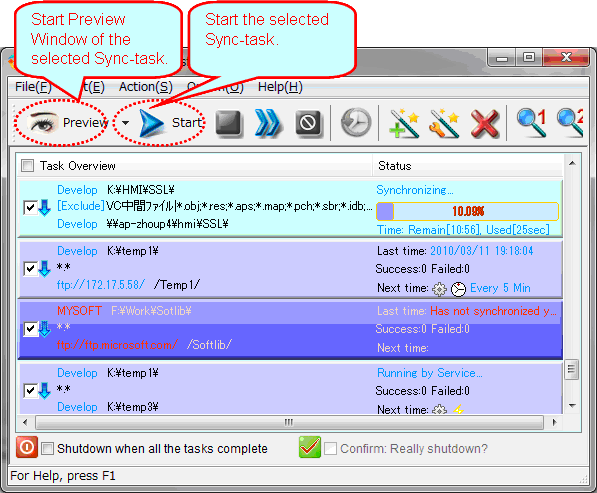
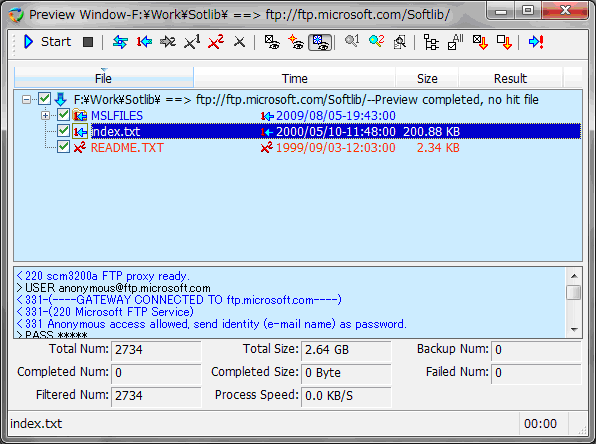
15. Confirm the settings by start the preview of the task.
Press the "Preview" button on the main window to start the preview window, to confirm if you have configure the settings correctly.
At the bottom of the preview window, there is a log window. All the commands sent to WebDAV server, and responses from the WebDAV server are logged here. If there is any error happens, the error will also be logged here.
The hit files and synchronisation actions will be listed in the preview window. You can confirm if the synchronisation will be performed correctly. You can also modify the synchronisation actions, then press the "Start" button to start the synchronisation.
(END)